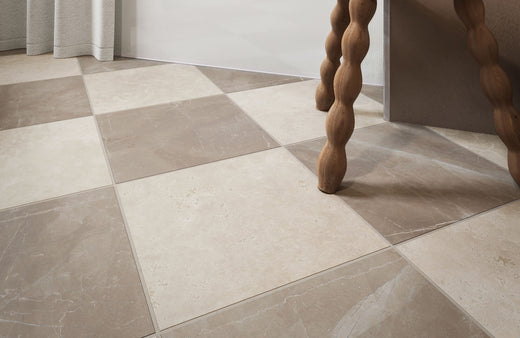
Checkerboard tiles, with their bold, contrasting designs, are commonly used in residential and commercial settings to create dynamic floors, walls, and backsplashes. From kitchens and bathrooms to retail spaces, their timeless pattern adds visual interest and sophistication to any setting. Selecting the right adhesive for this tile is essential for ensuring a durable and long-lasting tile installation. The correct adhesive will prevent tile shifting, cracking, or peeling, maintaining the integrity of your checkerboard patterns over time.
In this guide, we'll look at the best adhesive options for checkerboard tiles, taking into account tile material, substrate type, and room conditions. We'll also go over key adhesive properties to look for, such as setting time, flexibility, and waterproofing, to ensure a secure and desirable installation.

Types of Adhesives for Checkerboard Tiles
When selecting the best adhesive for checkerboard tiles, it's critical to understand the various options and their distinct advantages. Each adhesive type has unique properties that suit different materials, environments, and applications, so selecting the right one for your project will result in a secure, long-lasting installation. Always follow the manufacturer’s instructions to ensure optimal performance and durability for your specific adhesive and tile type.
Thin-Set Mortar
Thin-set mortar is a versatile cement-based adhesive that is compatible with ceramic, porcelain, and natural stone tiles, making it ideal for checkerboard patterns on floors and walls. This adhesive is extremely durable, capable of supporting heavy-duty applications, and is moisture resistant once cured, making it ideal for both residential and commercial settings. However, for maximum effectiveness, it must be applied to a clean, primed surface and in environments where the adhesive can fully cure without being subjected to extreme temperature fluctuations.
Mastic Adhesive
Mastic adhesive is a pre-mixed, ready-to-use option ideal for lightweight tiles, particularly in vertical applications such as kitchen backsplashes or accent walls. It fits well with ceramic and smaller porcelain tiles, which allows for simple and quick installation. However, mastic is not water resistant and should not be used in high-moisture areas such as bathrooms and showers. It is ideal for interior applications because it forms a strong bond when kept away from moisture-rich environments.
Epoxy Adhesive
Epoxy adhesive is a highly durable, water- and stain-resistant option ideal for frequently used places and moist environments such as bathrooms and kitchens. It works well with ceramic, porcelain, and even glass tiles, forming a durable bond that can withstand heat and chemical exposure. Epoxy can be more challenging to work with due to its short setting time, so it is best suited for experienced installers or smaller sections to ensure even application. Its strength and resilience make it ideal to use in heavy-duty applications that require a high-performance adhesive.
Factors to Consider When Choosing an Adhesive
Choosing the right adhesive for checkerboard tiles entails more than just picking a brand; it also necessitates careful consideration of tile materials, substrate, tile size, and environmental factors. Each factor influences the adhesive's performance and the overall longevity of the installation.
Tile Material
The type of checkerboard tile material—ceramic, porcelain, or natural stone—is critical in determining the adhesive. Ceramic and porcelain tiles typically bond well with thin-set mortar, resulting in a strong, long-lasting hold. However, natural stone tiles may require a specialized adhesive to prevent staining and ensure proper bonding. To avoid bonding issues, always use an adhesive that explicitly states its compatibility with your tile type.
Substrate Type
The substrate, or surface beneath your checkerboard tiles, has a significant impact on the adhesive selection. Common substrates include cement board, drywall, and, in some cases, existing tile. A cement board is ideal for tile installations because it provides a solid, moisture-resistant foundation that is compatible with thin-set mortar. A mastic adhesive may be appropriate for drywall and other non-moisture-resistant surfaces, but make sure the adhesive is compatible with your specific substrate to avoid adhesion failures.
Tile Size and Weight
To avoid shifting or cracking, the adhesive must be strong enough to support the size and weight of your checkered tiles. Larger, heavier tiles require a stronger adhesive, such as thin-set mortar or epoxy, to keep them in place without slipping. Mosaic tiles or smaller, lighter tiles may work with mastic in simpler applications, but stronger adhesives are recommended for floor installations, particularly in areas that are frequently visited, to ensure maximum durability.
Room Conditions
Environmental factors such as moisture, temperature changes, and sunlight exposure all have a direct impact on adhesive performance. To avoid moisture problems in areas with high humidity, such as bathrooms, use water-resistant materials such as epoxy. In areas with significant temperature fluctuations or direct sunlight, use a flexible adhesive that can accommodate slight tile expansion and contraction, ensuring that your checkerboard installation remains stable over time.

Application Tips for Checkerboard Tile Adhesives
A perfect checkerboard tile pattern requires an accurate adhesive application. Proper surface preparation, mixing, application, and tile setting techniques will all contribute to a secure and long-lasting installation. Be sure to follow the manufacturer’s instructions for each adhesive product to ensure the best results and maximize durability.
Surface Preparation
To ensure strong adhesion, the surface must first be prepared. This includes thoroughly cleaning the substrate to remove dust, dirt, and grease, followed by leveling it to prevent uneven tile placement. If the substrate material requires it, use a primer to improve bonding. Skipping these steps can result in adhesive failure or tile lifting over time, so be sure to thoroughly prepare the surface.
Mixing Adhesive
Adhesive consistency is critical for successful application. Follow the manufacturer's instructions carefully, mixing the adhesive until it reaches the desired consistency. Overly thick or thin adhesive can weaken the bond, which causes tile slippage or poor adhesion. To avoid premature setting, only mix as much adhesive as you can apply within the working time.
Applying Adhesive
To achieve consistent coverage, spread the adhesive evenly across the surface with a notched trowel while holding it at the proper angle. This technique reduces gaps and ensures that the tiles bond securely. Spread the adhesive in sections, applying only enough to tile within the adhesive's working time. This approach is especially important for checkerboard patterns because it ensures precise lines and alignment.
Setting Tiles
To achieve an even checkerboard appearance, carefully align the tiles and keep the spacing consistent. For greater accuracy, use tile spacers. Press each tile gently into the adhesive, using light pressure to ensure good contact and bond. Also check alignment on a regular basis to prevent shifts, and make any necessary adjustments before the adhesive sets.
If you want to see how the right checkerboard tile can transform your space, use our augmented reality (AR) tool to view different colors and finishes in real-time. It's a great way to test out various options and see how each tile choice affects your interior design before making a final decision.
Common Mistakes to Avoid
Avoiding common mistakes during your checkerboard tile installation can mean the difference between a professional-looking finish and one that falls short. A strong, long-lasting bond can be achieved by carefully selecting an adhesive, preparing the surface, mixing it, and drying time.
Using Incorrect Adhesive
Selecting the wrong adhesive for your checkerboard tile type or application can result in poor adhesion, causing tiles to shift, crack, or even detach over time. Check that the adhesive is appropriate for the tile material (ceramic, porcelain, or natural stone) and the location (dry or wet). Using the appropriate adhesive from the start is critical for a secure installation.
Improper Mixing
Mixing adhesive incorrectly can reduce its strength, limiting its ability to effectively bond tiles. Following the manufacturer's instructions for the proper water-to-powder ratio is critical for achieving the desired consistency. Overly thick or watery adhesive will not hold your checkerboard tiles securely, so mix in small, manageable batches to achieve the desired consistency.
Skipping Drying Time
Before proceeding with grouting, it is critical to allow adequate drying time. Rushing this step may reduce adhesive strength, causing your checkerboard tiles to shift or crack as they settle. Follow the adhesive's recommended drying time to ensure it has completely set before grouting or adding additional layers, ensuring a durable, professional finish.
The Perfect Adhesive
Choosing the proper adhesive for your checkerboard tiles is critical to ensuring a secure and long-lasting installation. You need to consider tile material, substrate compatibility, and environmental conditions when choosing an adhesive that meets your specific needs. Understanding the various types of adhesives and their properties will also allow you to make an informed decision that will enhance the durability and aesthetic appeal of your tile work.
To achieve a flawless result, it is critical to adhere to best practices throughout the installation process. A successful tile installation that not only lasts but also improves the overall appearance of your space will require proper surface preparation, accurate mixing, and adequate drying time. By prioritizing these steps, your checkerboard tiles will retain their integrity and beauty for many years to come. For any questions or personalized guidance, don’t hesitate to contact us! Our team is here to assist you through each step of your checkerboard tile selection and installation, helping you achieve the perfect style and durability for your space.


