


Wood look tiles bring the timeless charm of hardwood together with the durability and low-maintenance benefits of the tile. However, even the most beautiful tiles can fall short of expectations if they aren't laid properly. From layout patterns to grout spacing, the way your tiles are laid plays a major role in whether your space feels cohesive and natural or ends up looking mismatched and forced.
Whether you're refreshing a room, planning a commercial space, or tackling a DIY project, knowing how to lay wood look tiles properly makes all the difference. In this article, we’ll guide you through the layout options, practical tips, and common mistakes to avoid so your floors not only look great but also stand out.

Consider the Room's Purpose and Layout
Before getting into tile patterns or grout spacing, it’s important to start by considering the room itself. How the space is used and how people move through it can influence the best way to lay your tiles.
Analyze the Room Shape
The shape of a room plays a big role in how your tile layout will look and feel. For example, in long, narrow spaces like hallways or rectangular living rooms, laying tiles lengthwise along the longer wall can help visually stretch the space and create a more fluid sense of movement. In contrast, square-shaped rooms offer more flexibility; you might choose a diagonal layout to break up the symmetry and add visual interest, or go with a horizontal layout for a clean, simple look.
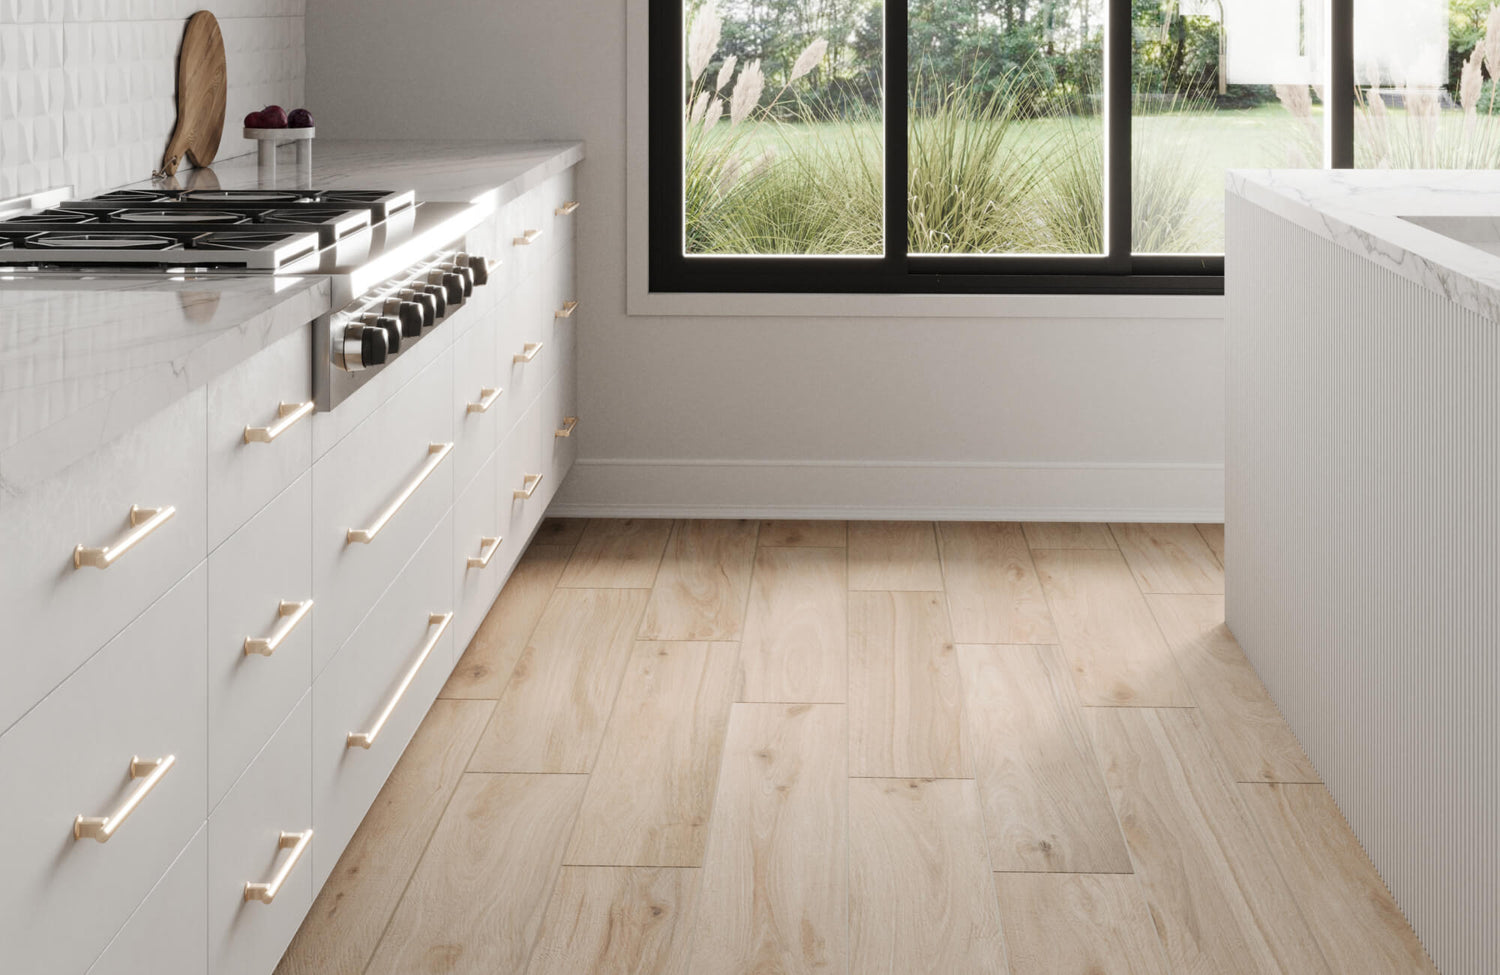
Looking at real-life spaces can be a helpful way to see how tile orientation impacts the overall feel of a room. As shown in the photo above, Edward Martin’s Preston 8x48 Matte Porcelain Tile in Pine is a great example of how tile size and direction can complement and enhance a room’s layout. Its natural wood grain and elongated plank design help guide the eye through the space, making the kitchen feel open, cohesive, and intentionally designed. Choosing wood look tiles like Preston not only adds warmth and texture to the floor but also subtly emphasizes the room’s proportions in a way that feels effortless and refined.
Match the Layout with Function
In busy areas prone to spills or heavy furniture, such as kitchens or family rooms, it’s usually best to stick with layouts that feel stable and functional. A simple plank or staggered pattern not only offers a grounded look but also supports easy movement and keeps grout lines from becoming too noticeable.
On the other hand, more relaxed spaces like bedrooms or guest lounges can give you the freedom to explore more decorative layouts. In these areas, unique patterns can introduce warmth and character, adding charm without overwhelming the design. Ultimately, your tile layout does more than serve a practical function; it helps define the atmosphere and flow of the room from the moment you walk in.
Direct with Pattern
The direction in which your tiles run can highlight key features in a room, such as a freestanding tub, a statement fireplace, or a pair of double doors leading to the outdoors. In open-concept layouts, thoughtful tile orientation can also help define different zones without the need for walls or dividers.
This approach works especially well in multipurpose areas. For instance, running tiles in one direction through a dining space, and then adjusting the orientation slightly as you enter the kitchen, creates a smooth visual transition while still maintaining cohesion. When used with intention, tile direction brings a sense of movement, clarity, and effortless flow to any room.

Choose the Right Pattern for Visual Impact
Once you’ve worked out the layout and purpose of your space, the next step is choosing a tile pattern that ties everything together. The right pattern doesn’t just add visual interest, it also sets the tone, enhances the room’s proportions, and brings character to the design.
Straight Lay for a Clean Look
If you're aiming for a streamlined and modern aesthetic, a straight lay pattern is a great place to start. In this layout, each tile is installed side by side in a grid, making it easy to align everything evenly. It's especially effective with wider planks because it emphasizes the length and wood grain without drawing too much attention to grout lines.
This pattern works particularly well when paired with a tile that highlights natural texture and color. As shown in the photo above, Edward Martin’s Preston 8x48 Matte Porcelain Tile in Poplar perfectly illustrates how a straight-lay pattern can enhance a bright, modern kitchen. Its soft wood grain and light, airy tone complement the clean architectural lines, while the consistent layout keeps the focus on the material’s natural elegance without competing with the room’s other design elements.
This option is also beginner-friendly and works well in minimalist interiors where you want your flooring to blend effortlessly with the rest of your decor. You’ll notice how it quietly enhances the room without overpowering it, creating a sense of calm that’s both contemporary and timeless.
Offset for a Natural Wood Feel
If you're aiming to replicate the look of traditional hardwood, a staggered or offset layout is a great way to achieve that authentic, lived-in feel. In this pattern, each row of tiles is slightly shifted from the one before, creating a layout that reflects the natural variation and rhythm of real wood planks. For longer tiles, a 1/3 offset is often recommended over a full 50% stagger, as it helps reduce tile lippage caused by subtle bowing.
This layout is especially well-suited for casual or rustic-style homes, where comfort and character are key. It creates a relaxed, familiar atmosphere that feels warm and inviting. As a bonus, the soft variation between rows can also help mask minor imperfections, making it a smart choice for busy or family-friendly spaces.
Herringbone or Chevron for a Statement
If you’re looking to make a bold, design-forward statement, herringbone and chevron patterns are excellent options for adding immediate visual interest. Their interlocking angles naturally draw the eye through the space, making them especially effective in areas where you want to create a strong impression, such as foyers, entryways, or focal points like a powder room floor or fireplace surround.
Although both patterns are attention-grabbing, each brings its distinct character. Chevron creates a sleek, modern aesthetic with precisely cut tiles that form a continuous zigzag, while herringbone offers a more traditional, woven look using standard rectangular planks. Whichever style you choose, you're adding a striking design feature that feels thoughtful, artistic, and elevated.
Mixed Width or Random Layouts
If you're aiming for an eclectic, personalized look, mixing plank widths or using a randomized layout can bring a floor to life with character and charm. This style draws inspiration from reclaimed or vintage wood flooring, where no two boards are exactly the same. It’s an ideal choice when you want your space to feel warm, distinctive, and full of personality.
To pull it off successfully, variety should be embraced with intention. Thoughtfully balancing color tones and plank sizes also helps keep the design visually engaging without feeling chaotic. This approach works especially well in bohemian, farmhouse, or transitional interiors, where a relaxed, lived-in vibe enhances the overall aesthetic.

Focus on Subfloor and Tile Orientation
Once you’ve settled on your layout and pattern, the next step is to ensure you’re building on a solid foundation. How your tiles look and perform over time depends largely on what lies beneath and how carefully they’re installed.
Level and Clean the Subfloor
Creating a smooth, stable surface is a critical first step when installing wood look tiles. Because these tiles are often long and narrow, even slight dips, bumps, or debris on the subfloor can lead to visible imperfections like lippage or uneven edges. Unlike smaller tiles that may hide minor flaws, wood look planks tend to emphasize them.
To ensure a clean, level foundation, always inspect the subfloor using a straight edge or level before starting. If you notice uneven areas, applying a self-leveling compound will help create a flat, stable base, setting the stage for a seamless installation that looks great and holds up over time.
Run Tiles with Natural Light
When it comes to tile orientation, natural light can make a significant difference in how your flooring looks and feels. As a general rule, it's best to lay wood look planks in the same direction as your primary light source; such as a large window or glass door. This approach not only highlights the grain and texture of the tile but also helps create a smooth, continuous flow throughout the space.
On the other hand, laying tiles perpendicular to the light source can have the opposite effect. Shadows and grout lines become more noticeable, which may interrupt the visual harmony of the floor. Aligning tiles with the direction of natural light helps minimize these distractions and results in a more unified, soft appearance that makes the entire room feel brighter, calmer, and more cohesive.
Align with Architectural Features
In addition to natural light, it’s important to consider your room’s architectural features when determining tile orientation. Elements like the longest wall, a run of cabinetry, or the direction of a hallway can serve as visual anchors that guide your layout. Aligning tiles with these features often results in a design that feels intentional, well-balanced, and visually connected.
On the other hand, when tiles run against fixed elements such as a kitchen island or the edge of an entryway, the layout can feel slightly off, even if the installation is technically flawless. This becomes especially important in open-concept spaces where one area flows into another. Taking time to establish alignment early helps maintain visual continuity and brings a sense of harmony to the entire space.

Understand Grout Joints and Spacing
Grout joints and spacing might not be the first thing you think about when planning your tile installation, but they’re just as important as the tile itself. From choosing the right width to selecting a compatible color, grout decisions can make or break the final look.
Select the Right Grout Width
When working with wood look tiles, opting for a narrower grout line is almost always the best choice. A width between 1/16” and 1/8” typically creates the most convincing hardwood appearance. Anything wider can interrupt the visual flow and take away from the natural, plank-like effect you’re aiming for.
Aside from appearance, grout width also plays a role in installation quality. Narrow lines demand more precise tile sizing and a well-prepared subfloor to avoid alignment issues. However, when done correctly, the result is a smooth, seamless finish that closely mimics the look of real wood flooring.
Use Color-Matched Grout
Grout color can have a surprising impact on the final look of your tile installation. To achieve a realistic hardwood appearance, it’s best to choose a grout color that closely matches the color of your wood look tiles. This minimizes the visibility of grout lines, allowing the eye to focus on the texture and grain rather than the seams.
Although contrasting grout can create a bold, modern effect, it’s rarely the preferred choice for wood look tiles. The goal is to maintain a natural, seamless appearance, and even a slight mismatch in color can become distracting once spread across the entire floor. What seems subtle in a small sample can become much more noticeable across an entire floor, ultimately detracting from the natural, wood-like appearance.
Plan Expansion Joints
When working on larger tile installations or in areas exposed to direct sunlight, it’s especially important to plan for movement. While tiles don’t expand and contract as much as natural wood, they still require some flexibility. To accommodate this, adding expansion joints or leaving space along the perimeter allows the floor to adjust to temperature changes without building pressure that could eventually lead to cracks.
Although these joints are typically concealed once baseboards or transition pieces are installed, they play a crucial behind-the-scenes role in the overall stability of your floor. Over time, this small yet essential step can make a significant difference in maintaining both the strength and appearance of your tile installation.

Incorporate Wall and Vertical Applications
Wood look tiles aren’t just for floors. They’re also a beautiful way to add warmth, texture, and character to vertical surfaces. From cozy accent walls to eye-catching fireplace surrounds and even tranquil outdoor showers, these tiles bring the charm of wood to spaces where natural materials might not hold up.
Choose Lighter Tiles for Walls
When tiling vertically, lighter tones are often the most effective choice. They reflect more light, which helps the space feel brighter, more open, and visually larger. Narrower or vertically oriented planks also tend to be easier to install on walls and provide a clean, balanced look without overwhelming the design.
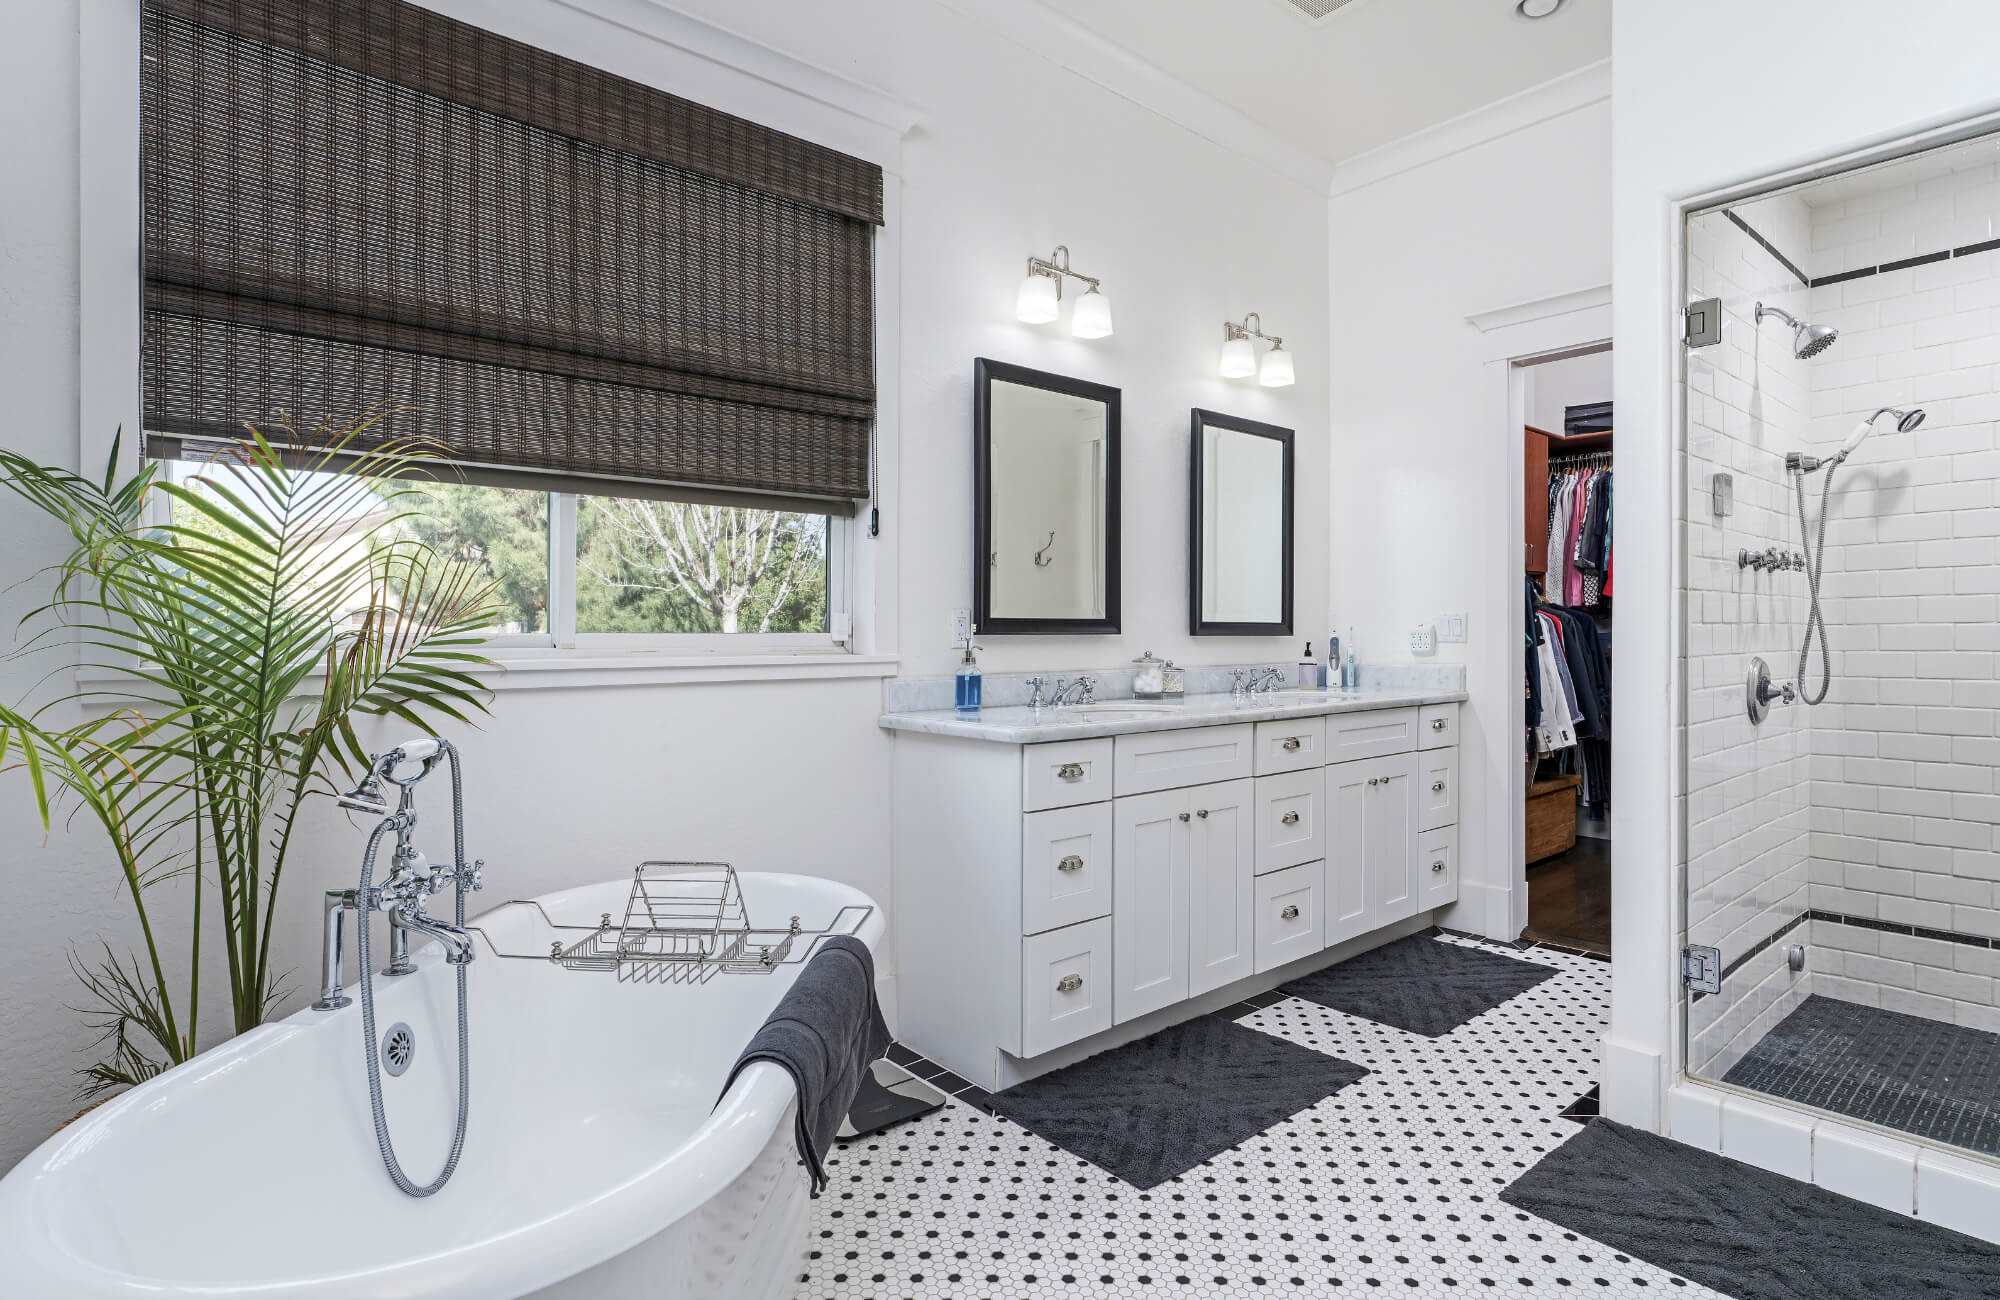
This strategy is especially useful in smaller spaces like bathrooms, where both light and square footage may be limited. A perfect example is Edward Martin’s Jameson 12x36 Matte Ceramic Tile in Camel Deco, as shown in the photo above, which brings a warm, refined touch to the shower wall while maintaining a fresh, airy feel. Its soft wood tone and linear texture also add just the right amount of detail, creating interest without making the surface feel too heavy or enclosed.
Lay Vertically or Horizontally with Purpose
Tile direction plays an important role in wall installations, helping to shape the perception of height, width, and overall atmosphere. A vertical layout can make walls appear taller and more dramatic, which works well in shower stalls or narrow niches. In contrast, a horizontal layout creates a sense of width and calm, making it ideal for smaller or more relaxed spaces. Choosing the right orientation depends on the effect you want to achieve, whether that’s adding a feeling of movement or creating a more grounded and balanced look.
Add Decorative Tiles
If you want to bring even more personality into your space, adding decorative wood look tiles is a great way to do it. These textured or patterned tiles offer depth and dimension beyond the flat wood aesthetic, making them perfect for adding interest to vertical surfaces. They work especially well in bathrooms, where even small design choices can have a big impact, whether featured behind a vanity mirror, inside a shower niche, or as part of an accent wall.
Aside from visual appeal, decorative tiles also create soft shadows and tactile variation, encouraging a more interactive experience with the space. This added layer of texture can transform a plain wall into a distinctive design feature that feels intentional and beautifully done.

Avoid These Common Installation Mistakes
Even with the best materials, the final result depends heavily on how the tile is installed. A few simple missteps can lead to long-term issues that are often avoidable with the right approach.
Using a 50% Offset with Long Planks
Many assume a 50% stagger is ideal, but that’s not always the case with wood look tiles. Although it may seem like a traditional approach, this layout often leads to tile lippage due to the slight bowing or warping common in longer planks.
A better solution is to use a 1/3 offset, which reduces height variation between tile edges and creates a more level, visually cohesive surface. This small adjustment also helps maintain the clean, continuous look of natural wood without sacrificing durability or finish quality.
Using the Wrong Trowel Size
Achieving a strong, long-lasting tile installation starts with proper coverage, and the trowel you use plays a big role in that. If the trowel is too small or not in the right shape, it can lead to poor adhesion and create hollow spots beneath the tile. For wood look planks, a 1/2” x 1/2” square-notch trowel is typically the best choice, as it helps spread the adhesive evenly. To ensure full contact and reduce the risk of gaps, it's also a good idea to back-butter each tile before placing it.
Not Blending Tile Boxes
Wood look tiles are designed with natural shade variation to replicate the look of real hardwood. However, if tiles aren't blended properly during installation, that variation can appear uneven or unintentional. Installing tiles one box at a time often leads to visible patches of mismatched tones. To prevent this, open several boxes at once and mix the tiles as you go. This simple step helps create a more balanced, organic look that feels cohesive across the entire floor.
Rushing the Layout Planning
Starting tile installation without a clear layout plan can easily result in awkward cuts, uneven spacing, or off-center designs that are hard to correct once the adhesive is down. These issues not only affect the final look but can also be frustrating to fix later. To avoid this, take a few extra minutes to dry-lay several rows of tile before you begin. This also gives you a chance to visualize how the planks will line up with walls, doorways, and key features in the room. Making small adjustments during this stage ensures a more balanced and professional-looking result once everything is in place.
Achieving the Right Layout
Wood look tiles should be laid with careful attention to layout, orientation, and spacing to achieve a realistic and lasting finish. Start by considering the room’s shape, lighting, and function to guide tile direction and pattern choice. In addition, use narrow, color-matched grout lines, prep the subfloor properly, and blend tiles from multiple boxes for a seamless look. With thoughtful planning and precise execution, you’ll create a space that feels both natural and beautifully put together.
To help you visualize your project before making any final decisions, try using our AR tool to see how different wood look tiles and patterns will appear in your actual space. If you're still deciding, you can also request a tile sample so you can experience the texture and color firsthand. Sometimes, seeing the tile in your own lighting and environment is all you need to feel confident about your choice.
